By Steve Shupert
Power tools are expensive and vital to any fireground operation. These tools help save lives and make our job safer. Keeping them operating is important and easy to do. In this article, we will cover basic troubleshooting and everyday maintenance suitable for the firehouse.
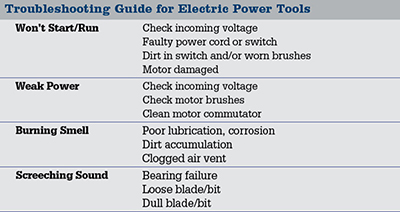
GENERAL POWER TOOL TROUBLESHOOTING
When your tool system is malfunctioning, typically there will only be one thing wrong. Most troubleshooting techniques operate from this premise. The most efficient way to find the problem will be to start at one end (usually the power source) and work toward the operational end of the tool (without making assumptions). Inspect, isolate, and test each component until you have identified the problem. Trace out the flow of energy, find where it stops, and determine why. Be logical and methodical and test individual components of the system by swapping them out with a known good part. The problem is usually something simple. Following this process every time will quickly identify the problem or multiple problems in a timely, efficient manner rather than through time-consuming trial and error.
Ways To Damage Your Tools
|
Resist starting in the middle of the system you use to troubleshoot problems. This will often result in your going back and forth looking for the problem. If there are multiple problems, you will quickly become frustrated. Being good at keeping tools running is as important as being a good tool operator.
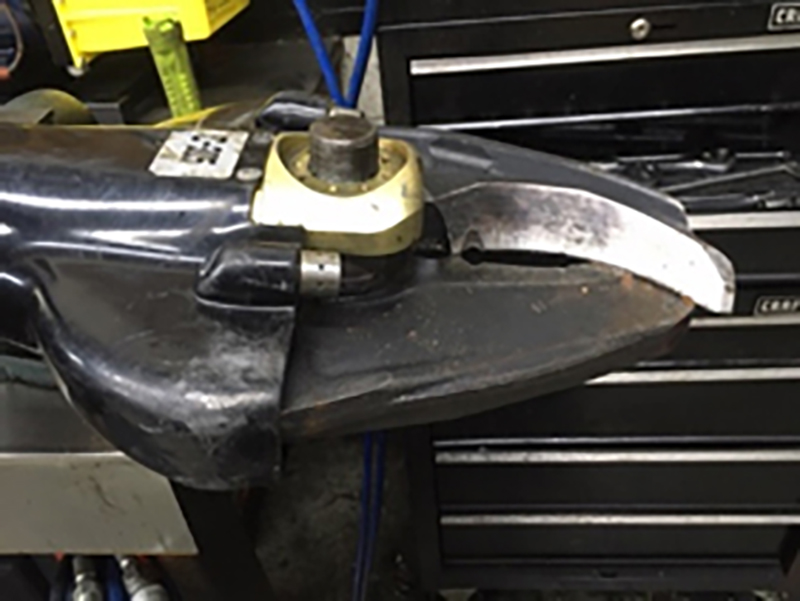
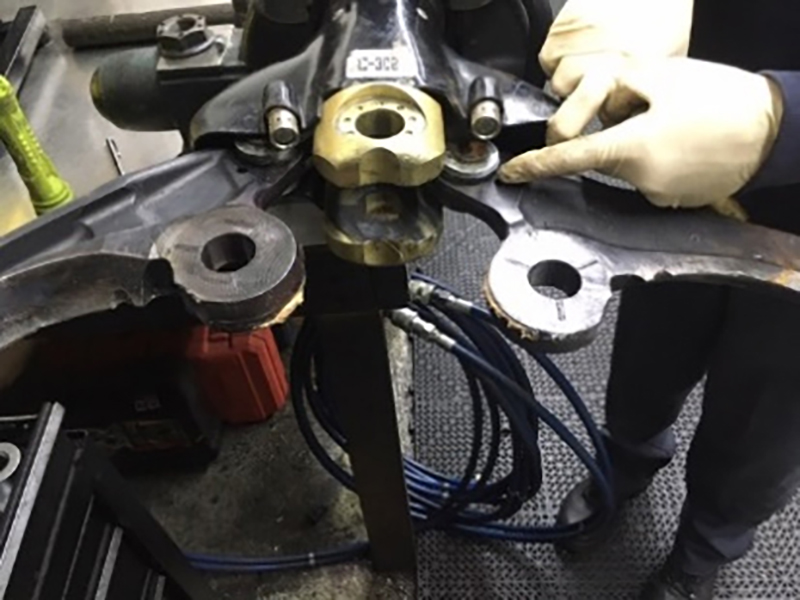
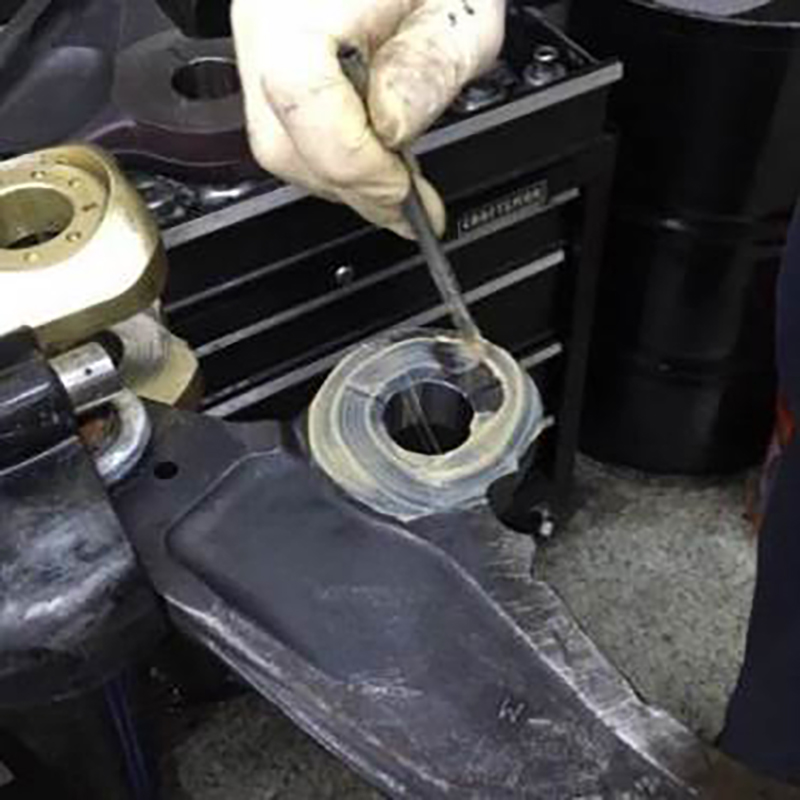
1a 1b 1c Hydraulic shear blades often loosen and separate. This condition must be corrected before you break the shears off completely. Tightening them is relatively easy. Remove the pivot bolt—it may be held in place by set screws. Take care not to damage the threads, pull the blades apart, clean, and lube. Expect to find windshield glass dust and metal shards causing excessive wear. A special lubricant may be required; read your manual. Retorque to manufacturer’s specification. (Photos courtesy of author.)
FIVE COMMON POWER TOOL BREAKDOWNS
Following are five common power tool breakdowns and ways to troubleshoot them.
- Won’t turn on. Check your power supply by plugging in another tool—electric, hydraulic, or pneumatic—and determining if it’s the tool or the power source. Use the same technique if it’s a battery tool. Check for a dirty trigger switch and check cords/hoses.
- Low power, tool is running weak/slow. Again, check your power source. Do you have the air regulator pressure set properly? Low on hydraulic fluid? Extension cord too long, motor brushes worn out? Check connections and couplings.
- Burning smell. Does it smell electrical or oil-based? It could be bearings, lack of lubrication, or debris caught in the motor case. Does your tool have a drive belt like a rotary saw? Turn the tool off immediately and start digging into it.
- High-pitched noise. The gears are not meshing—the tool got dropped, and now something is bent. There may be something stuck in the motor, or it is underlubricated. Shift through gears (if appropriate) and listen for any changes. If something is loose, check to make sure all the fasteners are tight.
- Smoke or fire. Turn off immediately. Once the tool has cooled, inspect it.
Mistakes Using an Extension Cord
|
KEEP Tools CLEAN
Wipe down tool exteriors with any good solvent/cleaner and rags/brushes. Use compressed air [30 pounds per square inch (psi)] to clean out interior spaces of a power tool. You will have built up “crud” in the hard-to-see or vented areas. Use an aerosol electrical solvent to loosen collected grime on electrical tools/triggers. For pneumatic or hydraulic tools, use a degreaser. Follow the tool manual for relubricating after cleaning. At times, a toothbrush, toothpick, or cotton swab will be helpful. A clean tool, inside and out, runs better.
HYDRAULIC HOSES/TOOLS/PUMP MAINTENANCE
National Fire Protection Association (NFPA) 1936, Standard on Rescue Tools, recommends having the pump pressure tested every year to make sure you have no seal or pressure problems. Additionally, perform the following:
- Inspect hose and couplers for physical, thermal, and chemical damage.
- Check for any leaks. Many can be fixed by simply tightening the threaded connections.
- Do not use the hydraulic hoses to lift, carry, or move any of these tools or power units.
- Take any hose with bulging or swelling out of service.
- Avoid sharp bends or kinks in hydraulic hoses. If pressure is applied to a bent or kinked hose, the flow restriction will cause severe backpressure, which may lead to internal damage of the hose lining and cause hose failure. The system is protected with check valves and relief valves that minimize this risk.
- Clean hoses and couplers with soap and water, wipe down, and let air dry. Keep couplers out of dirt. Use dust caps.
- Keep fuel fresh and change plugs/filters/hydraulic fluid at proper intervals.
- Start the engine/pump with the dump valve open so the gas engine has no load on it during startup.
- Open the dump valve when changing out tools unless you have the “hot” disconnect couplings.
A torque wrench is a tool designed to accurately tighten nuts and bolts to a calibrated torque measured in foot-pounds. Use it to tighten the pivot bolt on cutters. It can only be used to tighten something. To use a torque wrench, adjust the handle and set it to a specific level of torque (foot-pounds). Use the tightener on the end of the handle to lock the setting in place. Then, fit the socket, nut, or bolt and turn it clockwise to tighten it. Some wrenches “click” when the torque is set; some are a direct read on a scale or display. When you’re done, turn the settings on the handle back to 0.
NFPA 1936 recommends performing a pressure check on your hydraulic power unit annually to help ensure it is building pressure up to specification. If your tool seems weak or slow, this test will tell you if it’s the pump or the tool. It is an easy test to perform. Adjustments or repairs should go to a qualified technician.
ELECTRIC POWER TOOLS
Electric power tools typically die in one of several ways:
- Power cord.
- Broken trigger switch or wire.
- Worn brushes.
- Power transfer failure, gears/belt.
- Motor failure or overheating.
If you notice an excessive rattling noise, sparks, and loss of power, it is likely that the motor brushes need to be replaced. There are typically two small plastic caps holding the motor brush in place. Removing them (unplug the tool first) gives you access to remove and replace the brush. As the brushes wear, they deposit dust inside the tool. Some tools will require more disassembly to access the brushes.
As needed, apply a spray of a dry Teflon-based lubricant to the shaft/chuck of the tool. Do not use a wet or oil-based lube. This will only attract more dirt. Some tools have an oil-bearing reservoir—maintain the oil level.
Don’t take for granted that the incoming voltage is correct. Measure it at the end of the cord to get all the performance possible out of the tool. Check it as the tool is working. Keep extension cords short.
If your electric power tool is used frequently (30 to 40 hours or more annually) or is just old, split the case open and clean and repack the gearbox with grease. Check and tighten screws and bolts after use.
TEST RUNNING A GENERATOR
No less than once a month, run your generator loaded. Start the generator, and slowly plug in electric loads until you have reached at least 50% to 90% of its load in Watts. Allow it to run for 15 to 20 minutes, then slowly unload the generator. Let it run with nothing plugged in for five minutes, shut it down, and check or top off fluids once it is cool.
If you have been test running your generator with no electrical load attached, you are doing damage. It will not burn fuel completely because it is not working as hard as it is tuned for, resulting in a spiral of problems, starting with the unspent fuel, causing carbon buildup. The engine will not heat up as it should, and lubrication won’t flow correctly. The unspent fuel can build up in the muffler and ignite. You will start getting white smoky exhaust and will burn more fuel than you should, damaging your engine.
KEEP CONNECTIONS BRIGHT AND TIGHT
We have all seen corroded car battery terminals and know that is a huge detriment to getting a car started. This corrosion causes a poor connection and thereby a voltage drop. The same concern is true for portable electrical systems and extension cords. Exposure to wet weather, salty roads, chemicals, and apparatus vibration all contribute to poor connections, rust, and corrosion. Inspect, clean, and tighten all these connections and treat them with an electrical corrosion preventive spray/paste.
Six Steps to Maximize Lithium-Ion Battery Life
|
THREATS TO AN AIR BAG
The threats to an air bag are heat, chemical, and mechanical damage. Use truck mud flaps, old firehose, or pieces of plywood as barriers to sharp objects and heat. Air bags can operate at temperatures between –40 and +150 °F.
Just as important as sizing up and guarding your bag against the threats listed above, you must also size up the ground conditions. The air bag is essentially a “jack.” If the ground is soft, the jack will push into the ground. When placing your air bag, smooth out uneven ground and remove sharp rocks and objects. Place plywood or cribbing under the bag to protect it as needed.
High-pressure air bag systems need to be functionally tested at least quarterly. Inflate a bag to 30 psi, hold at this pressure for 10 minutes, and apply a soap-and-water solution to clean and reveal any leaks. Check all hoses and bags for blisters, cuts, burns, and damage. Do not inflate an unloaded bag (bag not lifting a considerable weight) to look like a basketball. This can damage the interior seams of the bag. If you find a leak around the air inlet connection, bleed off all pressure, remove the fitting, clean the threads, install a new fitting, and retest. If you find a leak anywhere else, it is reason enough to take the bag out of service and return it to the manufacturer for further evaluation.
When dirt gets into the air fittings, just knock it out and wash with soap and water. Check regulator air gauge accuracy against self-contained breathing apparatus (SCBA) bottles; ensure gauge guards are in place. Check for the presence of the regulator “O” ring. Also check gauges on the air bag controller and check that the controls operate smoothly. Store the pressure regulator with adjustable “T” handle completely loosened so the spring does not develop a memory.
Manufacturers have varying lifespans for their specific bags; most have a shelf life of 10 to 15 years and recommend testing after three to five years from purchase and every year after 10 years. Check your operations manual for the testing timetable recommended for your system.
Pneumatic failures are violent and sudden. High-pressure air bags are air vessels not unlike SCBA cylinders. Do not take this for granted, even if you don’t use your air bags that often. They still age and need to be factory tested on their schedule.
CLEANING AND OILING PNEUMATIC TOOLS
Spray the tool, especially into the tool, with brake cleaner; shake the tool to make sure the liquid gets inside; then let the excess product drain out. Next, plug in the tool, and run it for 30 seconds to get rid of the excess product and dry the surfaces. Don’t dry fire the gun—it can jam the piston. Cut some sheet metal to blow out excess brake cleaner. Then add several drops of pneumatic oil to the tool’s interior and again operate the gun to circulate the oil. If you use SCBA air to power your pneumatic tool, oil the tool after every use. SCBA air contains no oil, unlike shop air from a compressor.
GAS ENGINES
All small (two-cycle and four-cycle) gas engines need at least four things to start and run:
- Cylinder compression. When you pull the starter cord, you feel the “pop-pop” of the piston cycling in a tight engine.
- Fuel being delivered to the carburetor and a functioning fuel line and filter (observed or smelled).
- Spark to a functioning spark plug.
- Air coming through a filter into the carburetor.
If one of these four things is missing or out of adjustment, you can have problems starting your motor. The basis for engine troubleshooting is centered on these four items.
Perform the following to tune up your four-cycle engine:
- Check for any loose parts or connections.
- Clean engine cooling fins.
- Fill the fuel tank with fresh gasoline.
- If there is a starter cord, check for any fraying.
- Drain and replace oil and change the oil filter if equipped. Check the manual for the proper type of oil.
- Change the spark plug.
- Change and clean the air filter.
- Change the fuel filter.
- If there is a battery, check for leaks and/or corroded terminals; clean as needed.
- Check the fuel cap, gasket, and vent.
- Check engine rpm and adjust as needed.
Remember to change the oil. If there is a dipstick oil level indicator, you can see the oil level. If not, oil (when full) should be at the top of the threads when you remove the oil fill cap. Run the engine for 10 minutes to heat the oil for a more complete drain of the dirty fluid. Change the oil every 25 hours of operation, or yearly. This is the simplest, least expensive, and most important maintenance to perform.
Be proactive with power tool maintenance. Read the manuals and keep the tools clean and working properly. Performing some simple tasks can go a long way toward keep these tools working and protecting your community.
STEVE SHUPERT is a lieutenant (ret.) from Miami Valley Fire District, Montgomery County, Ohio. He is rescue team manager and training officer for Ohio Task Force #1 US&R. He is a veteran of 11 federal deployments including WTC and Hurricane Katrina, a member of the DHS/FEMA Rescue Sub Group, a certified rescue specialist, a structural collapse specialist instructor, and a heavy equipment rigging specialist instructor. Shupert is director of training for Crash Course Village, a 501C3 nonprofit organization.